
A Broad Overview of Heat Treating
Heat treating is a multi-step operation, though not every step is necessary for every heat treatment. The four steps of heat treatment are:
ANNEALING – heating to just above ‘critical’, or phase change temperature, the point at which the steel becomes non-magnetic, then putting the steel in an insulating material like hardwood ashes or vermiculite so that it cools slowly. This will make the steel as soft as it is possible for it to be when it cools.
It is not necessary to anneal a steel before forging, as being at forging temperatures makes all steels soft and removes all previous heat treatment. You anneal so the steel will be as soft as possible while you do cold work on it, like drilling holes or filing.
NORMALIZING – heating steel to a temperature about 100 to 150 degrees above ‘critical’ temperature and cooling in air to black heat, that is, until it loses all incandescent color. This allows the carbides to evenly distribute throughout the steel and normalize (make uniform) the grain size.
Since most smiths have no accurate way to measure temps to ‘100 to 150 degrees above critical’, it is typically heated to just above non-magnetic for normalization, usually to good effect.
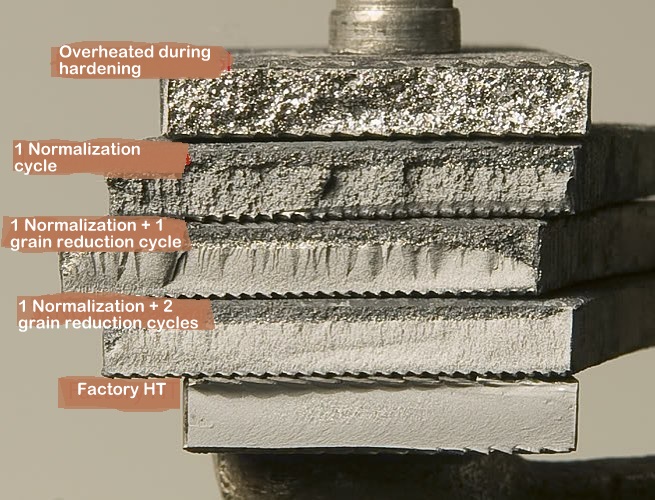
Normalizing is only one cycle, done once, and is followed by grain refinement cycles, which are a slightly lower temp each succeeding cycle. People refer to this whole process as normalizing, but normalizing actually grows grain slightly while evenly distributing carbides. It’s then followed by 2-4 grain refinement cycles.
HARDENING – In order for a steel to be hardened, it must have enough carbon. How much is “enough” depends on what you want a tool made of that steel to do. The lower the amount of carbon in the steel, the less hard it can be made.
You achieve hardness by heating the steel to just above ‘critical’, or phase change temperature, then cooling it suddenly in an appropriate quench medium, which may be different from one type of steel to the next, or one cross section (shape) to the next. This causes the steel to be as hard as it can be, but for most steels it introduces a certain amount of brittleness. How much brittleness depends on the amount of carbon in the steel, the cross section of the steel, and what alloying elements are in it. Carbon is the dominant factor in deciding how hard a certain steel can get. Different cross sections of steel can have hardenability dramatically affected by other alloying elements.
Things like chrome, nickel, vanadium, etc., increase hardenability, meaning the steel will harden with a slower quench. This is important because thicker steel cools more slowly. Not just the inside, which is obvious, but also the surface because it is receiving heat from the hot interior. A steel that will fully harden in water when it is 1/8″ thick won’t do that if it’s 4″ thick – unless it is alloyed for high hardenability.
‘Quench’ simply means to cool rapidly. In metalwork, each steel has an optimum cooling rate for hardening, and therefore an optimum quenching medium. Oil quenches more slowly than water, water quenches more slowly than brine. Quenching is part of hardening, but the terms are not interchangeable.
Rule of thumb:
Fast oil <10 seconds, for Wx, 10xx, etc
Medium speed oil 10-14 seconds, for 5160, 80CrV2, etc
Slow oil 14-18 seconds, for O1, etc.
You need to use an oil that matches the quench speed of the steel. For example: for 10xx steels you need Parks50 to quench the steel from critical to 800F in 1 second or less, for 5160 you need an oil that does this in 5-6 seconds, and for O1 10 seconds. Too slow and you don’t get maximum martensite conversion. Too fast will get you maximum martensite conversion but you’ll also get either surface cracks or micro fractures in the steel or both.
And lets not forget that certain steels require air quenching, or plate quenching or salt baths, etc.
So when someone asks “what oil should I use for quenching?” you also need to tell us what steel are you quenching.
One thing to point out that might not be obvious or maybe confusing to a new smith is that steels need to be quenched to below the pearlite nose in a specific amount of time. For example:
Wx and 10xx in <1 second
5160 in 5 seconds
O1 in 10 seconds
But quenchants are measured as the time it takes to cool a nickel ball from 1625F to 670F (These numbers I pulled off the web and not all have been verified):
Brine: ~4-6 seconds
Water: ~5-6 seconds
Parks 50: 7-9 seconds
50 Quench Oil: 7-9 seconds
Houghtoquench K: 7-9 seconds
Duratherm 48: 7-9 seconds
Parks AAA: 9-11 seconds
Duratherm Superquench 70: 10 seconds
Chevron Quench 70: 10 seconds
130F canola: ~10-11 seconds
Duratherm G: 10-12 seconds
Houghton Quench G: 10-12 seconds
Gulf Super Quench 70: 10-12 seconds
Gloc Quench A: 10-12 seconds
McMaster Quench Fast: 11 seconds
Citgo Quench Oil 0510: 14.5 seconds
Citgo Quenchol 521: 16.1 seconds
Citgo Quenchol 624: 17.0 seconds
Mcmaster Quenchall: 28 seconds
TEMPERING – Tempering takes a hardened piece and reheats it to some specific temperature to reduce brittleness and increase toughness. The necessary temperature is determined by the type of steel and the specific use for the implement made of that steel. A straight razor will have a different tempering temperature than a spring made of the same steel.
Temper pretty much IMMEDIATELY after the quench. Some steels when hardened have internal stresses that will lead to cracking of the hard but brittle steel. Tempering right away reduces that possibility.
Exceptions to this are if the particular steel calls for a period to “rest” prior to redraw. Not likely you will encounter such a steel, but there are some very unusual alloys that have unusual heat treat requirements.

An excellent resource (in North America) for heat treat information on most available steels and steel alloys is Heat Treater’s Guide Companion. It’s a free download for either iPhone or Android platforms. While intended for industrial heat treaters, it has lots of useful information for the blacksmith.
Written by Kirk Sullens
Henry Vila
Shane Stainton
Austin Hillrichs
Andrew Vida
*****************************************************************************************************************************************************
Temper colors are caused by oxidation of clean steel surfaces at specific temperatures. What color you get is dependent on the temperature your steel reaches…IF IT GETS UP TO TEMP QUICKLY. That causes the oxide layer to form and get thicker quickly, so in SOME circumstances the color is a helpful guide to estimating tempering temperatures.
The problem with depending on that is that a number of things affect those tempering colors; any residual oil on the steel surface will change the color of the oxide, as will lengthy heating cycles. Left at a specific temperature for long enough, a steel can run through ALL the ‘tempering’ oxide colors, even though the steel may never reach the temperature associated with a particular tempering color from a short heat cycle, simply because it stayed hot long enough for the oxide layer to thicken. So TEMPERING is about TEMPERATURE, not color.
The other issue is that home cooking ovens DO fluctuate in temperature. On top of that, the temp that your oven dial indicates may not accurately reflect the actual temp your oven reaches. Your oven cycles. It gets up to temp, then cycles off until the temp drops below a certain point, then it heats up again, just like your home furnace in wintertime.
What I do to address the cycling is to buy 3 oven thermometers (usually around $10 each at the grocery store) and put them in the oven and set it for 400 degrees (as an example). When the oven says it has reached 400, I check the thermometers to see if they agree with that temp. If they do, you can be fairly confident that your oven dial is accurate.
Since the oven thermometers can sometimes be inaccurate due to rough handling in the store, I look for any two that agree. If two agree, but are different from the oven dial, then calculate the difference between the dial reading and the thermometer reading so you know where to set the dial to get the actual temp that you want.
Since the oven cycles, but I want a blade, or hammer, or any other tool to remain as close to the desired temp as possible, I bury the steel in a cheap pan full of clean sand and put it in the oven. The sand will heat up with the oven, and your steel, but will cool down more slowly than the oven when it cycles, so it moderates the temperature. So long as the oven doesn’t go OVER the temp it’s set for, you won’t ruin the temper of your steel, no matter how long it’s in there.